Pages

Thursday, January 2, 2014

Skirts Make the Man

Breakfast at the worktable. Pretty good start to the second day of the New Year.

I bit the bullet and remade the tunic bodice since the original just wasn't working. Decided to do things a bit differently this time. It's funny actually - being some nine years into this whole costuming gig, I'm finding that stuff isn't good enough. What would have passed six years ago needs to be taken apart and completely redone today. While the finished product is a delight in itself, the process has become just as rewarding. That being said, there are still plenty of times where I want to pitch the sewing machine out the window.

Anyway!


The bodice became double-breasted with a grown-on collar. I was watching The Blue Max while sewing on the trim and realized that I had subconsciously made it a bit similar to the uniforms of First World War German pilots, which have always been wonderfully dashing (especially when worn by Karl Michael Vogler):


I did the trim with the help of Claire Schaffer's terrific Couture Sewing Techniques. It's a great reference if you want to level up your handwork.


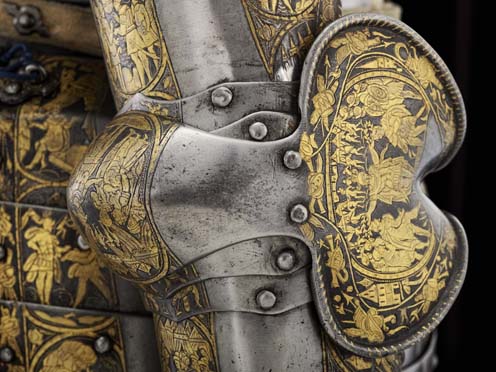
Trim is always a barrel of laughs. I fell-stitched it from the outside, wrapped it over the raw edge, and bound it to the inside. A few clips here and there around the neck edge helped it curve better. It doesn't lay was flat as it could but it could be worse. There's a heavy canvas interlining in there to give it a bit of body too. I didn't want bulk seam allowances so I basted them down. It wasn't possible to do the same to the outer fabric but I still wanted nice clean seams there so I cut narrow strips of Stitch Witchery, inserted it under the seam allowances, and pressed it. The Stitch Witchery acts like glue so it worked out pretty well. Just make sure you use a pressing cloth otherwise it makes a hell of a mess on your iron.


Because I really want to push the 'uniform' aspect with this, the lining is double-toned so I can have a nice red turn-back if I want. The idea here is to look just as sexy when I'm half-dressed as when I've got the full works on.


It will close with a concealed placket eventually. I'm still debating whether it needs an extra strip of black and white trim just outside the red; this particular chap is the Lieutenant after all...

The skirts also underwent some tweaking. I added a layer of canvas to the second skirt to help with the stiffness problem (thanks for the input there, everyone!) and did up the appliques. 


 Blogger is flipping stuff on me again so you'll just have to look at it upside down. I am still an applique n00b so my edges aren't as smooth as they could be. If anyone's got tips or tricks, I'm all ears!

Lastly, I pulled the third skirt off the original bodice. The double-breast set-up of the new bodice presented some difficulties for attaching it because the front split of the skirts doesn't line up with the front opening of the bodice (which is off to the side). In the end, I decided to button it to the inside of the bodice and the reasons were two-fold: the second and first skirts are going to be strung on a belt so having the third skirt inside the bodice cuts down on the outside bulk. It also stops the tunic from working itself up and over the skirts if I sit down or bend over.


It doesn't look like a lot on paper but these few details have been lurking in the back of my brain since March so it's nice to have them out of the way. Next steps? Carry on with the skirts, finish the arm-holes, and get started on the armour pattern.

There have been a few developments on the side - cast a new nose for Marius, decided on this summer's main project, and some utter craziness planned for late summer. More details to follow. Or if you can't wait that long, there's always Facebook!

Tuesday, December 3, 2013

All We Own...

And so back to Oz we go. When I initially conceived the idea for the Guard costume back in March, this is pretty much how things went:


A whole lot of enthusiasm but not much sense. And the results were... less than satisfactory. There was a lot of blind fumbling with skirt sizes and wasted time/fabric* as well as ham-fisted armour design due to a poorly proportioned dress-form.

So it's time to step back and figure out the next steps. First off, let's get a bit of design going on here. I've never been keen on a costuming project unless it's related to a character who makes the work interesting. This was an issue from the start with the Guards because they're all the bloody same. So the sketches started and after a couple of months, I started coaxing out some individualism.


There's already a noticeable difference from the Guard design in the film. They've ended up with pointy ears (because I wanted an excuse to have pointy ears) plus looong braids which may/may not be symbols of rank. Lieutenant Illarion in the top left is the chap I'm basing my costume on. I've got him pegged as the guy who gives the broom to Dorothy in the film. I've cooked up this whole backstory which morphed into a rather convoluted Oz 'fanfic' (gross) that lurks in the bowels of my hard-drive. There is even a Mk. I version of this costume - something light I could wear until the final version is finished.


ANYWAY, with a bit of time to mull the characters over and with commissions finished, it's time to get this road on the show again. So where are we at? Walk with me. We'll do this together. Currently, this is what I've got (damn, now I've got to put it on... right, just a minute here):


So when we left this in *coughAprilcough*, the skirts weren't fluffing out the right way but some clever application of bustles solved the problem perfectly.


Note the bustle fabric choice. This is currently missing the third skirt, which I have to recut. I'm tempted to add another layer of interfacing to the second skirt for extra support because they do have an obvious rigidity to them. The interfacing will be tricky - while it irons on smoothly enough, it develops bubbles over time where the adhesive lets go and I want these looking as smooth as possible from the outside. If anyone has tips on how to iron fusible interfacing to best effect, I am all ears!

Also, the shoes were a total fluke. The chaps in the film are wearing 'blocked' shoes and I didn't have the faintest clue what I was going to do here until I was over at my room-mate's parents for dinner one night. There was Chinese opera playing on the TV and one of the characters was wearing boots that were nearly identical to the Guards' footwear. My room-mate's mum happens to be just such an opera singer and - lo and behold - she had a pair in the house! A couple of weeks later, a pair were procured for my monstrous feet and we were off to the races. I'm going to build a greave system around these to widen them out a bit. (And practice walking in them because snapped ankles tend to put a damper on things...)


I'm trying to decide if I want to rework the tunic top to make it more robust. The hooks and eyes feel a bit precarious and the collar doesn't fit as well as it should. I want this whole thing to be as functional as possible - as if it were a real uniform.

So the next steps? Get the skirts straightened out. Add the second interfacing panel to the second skirt, add the embellishment, add the lining, and then move on to the final outer skirt. The second and third skirts will be held up with belts while the first one underneath is attached to the tunic top.

Onwards ho!

*I'm never sure which is worse. Probably time since you can usually buy more fabric.

Back in the Saddle!

So the last post was when.... let's see here... oh, in June. Most of my activity has been over on Facebook or even Tumblr, though the latter is more a repository for unrelated rants and pictures of dudes with sideburns (and occasionally pictures of yours truly with sideburns).

So what has happened in the interim? First off, I opened up commissions after Calgary Expo to gauge the interest (and since I was feeling my oats after the win at CCEE with Marius). Pumped out a couple of LARP tunics for a friend who plays a Hobling character and then took on a 1380s minor nobleman's ensemble which consisted of a chaperon, doublet, hosen, two shirts, and two underwear. I JUST tied up this commission last night so this is a preliminary 'catch-up' post before I head back into the thick of the Witch's Guard.

I also took a stab at vending at Edmonton Expo back in September. This required some labour-intensive leather work to pull together a variety of merch - mostly tech cases plus some business card holders because, you know, we're all grown up with jobs and shit.


As it turns out, I am horrific at selling my own stuff so my friend Chelsea took over and moved pretty near the whole works by the end of Saturday. Thanks, Chels!

And then there were the smaller personal projects. First, a new doublet to wear at the Brooks International Jousting tournament. Had been after a 1507 look with this one, a la the Unicorn Tapestries. Thanks to iskaralpust for the photo!


And then there was the Witch's Guard Mk. I, debuted at Edmonton Expo. Maybe that's why I couldn't sell my merch....


I was having a bad case of "Get On My Body" with this costume so I threw together something I could wear until the more elaborate version is done. More on THAT later...

And then Korra's parka, which is the final addition to that costume (besides a better wig at some point).


Things have been quiet blog-wise since all of these projects were made in a flurry due to tight time-frames. But that's about to change since it's back to work on the Big Stuff. The Big Stuff actually needs it own post so we'll turn there now.

Wednesday, June 5, 2013

Tally Ho! Sally Forth! Aka Greaves Part Deux

Hello new followers! Welcome aboard! Thanks very much for the interest.

Things have been pretty dead around these parts for the last... oh... two months. Calgary Comic and Entertainment Expo came and went. I managed to get Marius' greaves produced on schedule. When we left them, the poleyns + trim had been cut out but nothing had been sewn yet. Let's tie up that loose end first before we delve into Winkie Country.


Blogger flipped these for some reason but here is the trim going on the edge of the poleyns; you can just see the lettering. I find it helps immensely to contact-cement the trim first and let it dry while you awl the holes, otherwise your pieces will be sliding all over the place. It is attached with the usual saddle stitch deal - wonderfully easy to do and very strong. Then the curved fronts had to be sewn together and voila!


There was some remaining trim to sew on the greaves themselves and what better place to do that than the local tea shop:


What's that, you say? They closed it down to renovate the little downtown mall it was in? Thanks, Calgary. This is why you can't have nice things. Anyway, I'll miss it. It's seen hours and hours of art/writing from the roomie and I, plus a couple of hilarious RPGs with the broader Nerd Posse.

The actual feet or sabatons were the last pieces to be sewn together before I could start painting and riveting.


Here's the toe piece awled and ready to be stitched to the arch. That seam was the singularly hardest seam I've sewn to date: no matter how carefully I worked the awl, the holes would not line up. Cue bleeding fingers and tears.* But a couple hours and some four hundred expletives saw the job finished and everything was ready for the paint.


Meilhaus is using her dinner as an excuse to photobomb. Greaves and polyens both needed to be dyed and some trim painted before they could be riveted together due to pieces overlapping. As with the rest of Marius' armour, I used Fiebing's USMC Black dye. It took a couple of applications to get even coverage.


The riveting was an adventure unto itself. For some reason, it was impossible to get washers in the right size for the smaller rivets so I had to use the larger, thicker ones. Usually you use a bolt cutter to cut the posts down but - lacking a bolt cutter when I started this madness - I was using a old pair of nippers used for trimming horses which have the comparative bite of a garden slug (do they even have mouths?).


Anyways, here we are, in the woodshop at work over lunch. Between my co-worker and I, we managed to get the posts cut down easily enough but when I resumed riveting after work, things went a bit slower since there was no one to trade off with when my hands got too sore. But again, a few hundred expletives saw the job finished. The rest of the painting went together without a hitch. I saved the toes for last since I thought they would be too garish if I painted them gold.** But a few coats of dry-brushing did the job marvelously!


Before and after! One of the soldier chaps at work referred to them as 'horse boots' - I had intended the toes to look vaguely like hooves so it all worked out. The scrolled leaf motif is repeated on the falds of the pauldrons and on the front/back of the gorget. It was done by dampening the leather and stenciling in the design with a stylus and a template.

Finished the paint job laaaaate Friday night of Calgary Expo, then it was an early, early morning on Saturday to do the makeup and get ready. Got down to the grounds around 11:00 AM, threw the armour on with the help of friends, and then it was show-time!


 Thanks to Kardi for the photo! (And for helping me get dressed!)

Wearing this presents certain challenges - the boots add a few pounds to the bottom half and you've got to remember to walk fairly widely otherwise they catch on each other. Not necessarily a bad thing if you want to rock the genderbend. The costume contest started at 7 and ran very smoothly this year. For the skit, our awesome friend Peter and I ran a mocked-up gaming scenario that had a bit of a twist on the end. You can see it here - we are 7:46 - 9:17. I was worried it wouldn't read right to non-gamers but I think we got the point across. People seemed pretty enthused afterwards.

We came away covered in glory - Best in Show! Which was an incredible honour because there was some epic costumery this year - one guy had made a metal replica of the Witch King's armour from Lord of the Rings. Marius' comparative obscurity makes this all the sweeter - I had doubted for years that an obscure character could be successful in a costume contest but apparently that's not the case! Definitely helps when the judges are legitimate craftspeople.*** Marius is, of course, very near and dear to me as well. Funny how it all started back in March 2011 with a couple meters of yellow/purple silk for some ridiculous-looking pants or even earlier when I saw a photo of his miniature in the Warhammer rulebook and thought "... what gives?"

Anyway, I feel like I've got some closure on his gear now (apart from making some pimpin' gauntlets) so now it's full steam ahead with the Vinkus Guard! Like Marius, it's shaping up much more elaborately than planned but hey, it's the details that count, right? #obscurepunthatnobodygets


*Not the first time this has happened.
**Again, with Marius Leitdorf, you're doing it wrong if you're worried about garishness. Nothing is too garish for this guy.
***Read what you want between the lines there...

Monday, April 8, 2013

About Turn!


So..... slight change of plans.

The "Register Now" button for the Calgary Expo Costume Contest has been howling like a Greek siren all weekend so I caved last night and filled out Marius' information.

There's nerves and indigestion at work already but they're taking back-bench to the stuff that needs to be done. The costume, as it stands right now, looks like this:

 
Thanks to Dave Luckman for the shot.

Prior to SDCC last year, I had greaves in the works but they were never finished due to time constraints. So they're first on the list. I spent the bulk of this morning fooling around with tag-board patterns for the sabatons (foot armour). As the photos prove, there wasn't much success:


Foot armour is an fine, fine art I've yet to master and in a fit of pique, I dropped a chunk of leather in to soak, nailed it over the toe of the boot, and poked and prodded it until it looked the way I wanted:


Leather is far more forgiving than tag-board so it did what I wanted with minimal fuss. I'm eventually going to cut it down and sew it to a flat base that will slide over the toe of the boot. Not even going to attempt articulated plates here; instead, there will be a length of pliable leather between the greave bottom and the toe-cap. The Marius Leitdorf miniature shows toe-caps in a vaguely similar style so I think this will be okay.

(WTF... are those gaiters or greaves? You crazy, bro)

Setting the toe-cap aside to dry, the poleyns (knee-caps) were next. The pattern for them was very basic.


The longer piece sits on the outside of the leg (for more protection) and the shorter is on the inside. They attach along the curved fronts and give you this shape:


(Armour may not be as shown [This is actually part of a Dutch armour made for Henry Prince of Wales in 1607])

As per the rest of Marius' armour, the poleyns will have the decorative lettered bands around their edges. Here is everything cut out:


Leather work, while intensely rewarding, is also very time-consuming. To have a polished-looking product, you can't just cut the stuff out and get sewing; instead, there are a number of steps:

1. Cut pieces out.
2. Wet all the edges and buff them with that little white buffer wheel until all of the leather 'fuzz' is smoothed down.
3. Wipe all of the edges down with edge dressing which glues the 'fuzz' down permanently.
4. Run the stitch groover around all of the edges to prepare for your stitches (not done here yet since it's best to wait until everything is completely dry).

To do this collection of pieces, it's approximately an hour and a quarter. The work can be tedious but, frankly, it's nice to be on familiar ground again, especially in light of the Vinkus Guard project (which feels more like guess-work than actual planning...)

Time permitting, I want to make Marius a cape like this:


This is from Lynn McMaster's incredible 1590s Elizabethan Noble's Costume. I mean, just FEAST YOUR EYES. Isn't it fab? So despite being about seventy years out of period for Marius, I'm going to make it anyway because the Warhammer world let's me get away with it and it's sexy as hell.

Next steps:

-Stylus the lettering into the borders
-Glue them on to the armour pieces
-Awl and stitch them on to the armour pieces
-Stitch the poleyns together at the knee caps
-Keep thinking up good puns for the skit
-Have a better week than last week because, seriously.

Going to leave you with a super-nice shot of my Korra cosplay from Emerald City Comic Con. Many thanks to tanuki_green for taking such great candid shots and also to the wickedly talented Aziza of Peabody Tailoring for pointing it out!


And finally, a plug for The Tea-Drunk Tailor's Facebook page! Now with more WIPS, costume photos, and bizzarity!

Saturday, April 6, 2013

Do These Pants Make My Butt Look Big

Wine + chocolate + Long Island ice tea + blog. It's been one of those weeks*.

Let's get some pants on!


They're 90% done right now - just have to add an eyelet/lace setup at the back of the waistband. The striping and the paneling doesn't match up along the side seams but it continues routinely enough across the front where it matters. The waistband, which is about five inches tall, doesn't have a front opening - the whole works is just big enough to pull on and the lacing at the back will keep them up.... in theory. The ankles are finished the same way. These have medium-weight fusible interfacing on the inside and are lined with a tan cotton-linen blend.

The best part? They act as an unofficial crinoline for the tunic skirting, though they still aren't enough to give the skirts the 'fluff' they need. But again, we'll get to that in a minute.

When we left the colpack last, the framework was completed but the fur was a work in progress. The only quality faux fur around this neck o' the woods comes in 4" strips so it has to be sewn together before it'll be wide enough. Here we go:


If you do it right, the seam becomes completely invisible (there is one seam roughly in the middle of the foreground piece and two seams on the circular piece). My experience with faux fur was minimal so this tutorial saved my butt royally.


Aaaaaaaand.... colpack! I got the interior band finished this week but don't have shots so it'll make an appearance next post along with info on the hackle and the flamme.

Now the skirts are... resisting and it wasn't until I went through three needles and broke my sewing machine this afternoon* that I realized how to get them right (again... one of those weeks). I thought marvelous head-way was made Thursday night when I patterned them up:


About what you'd expect, right?


So let's get those puppies cut out and interfaced. Got it? K, good.

Wait! What's this? So the sizes are suddenly different? The first and second skirts are far too big at the back? Quelle mystery! Alright, let's cut them down.


Okay, better. The sizing is good here but will it be the same once they're fluffed out? You BET it won't! Even more, how do we get the bastards fluffed out in the first place? Because there is some massive bloody fluff happening here.


The silhouette is about 70% of the Guard costume; you can fudge a lot of the other details but you've GOT to get the damn silhouette right. Contrary to expectation, the interfacing didn't do the trick apart from firming them up nicely and after a week of humming and hawing and gnashing of teeth, I got an idea.

"Wait... there are those... what are they? Farthin.... farthingale things? Like... in ladies' clothes? Or bustles... I think?"

 
BAM!!!

With a slightly different shape and placement around the hips, we're going to have all the fluff we need. It's only a matter of sewing six of these, fixing them under each skirt panel, and we're in business. Now I only need the sewing machine back from the shop (a week and a half) and we're in good shape. Also have to re-cut the top two skirts because they are... after all... too small.

It's almost fortuitous since I needed a good excuse to start the armour.

*It was a combination of things. Lay-offs at work, irate donors, funerals, ignorant women budging the line to order 100g of everything in the bloody deli, shit weather. Also, the cookie. You know that thing where you're eating in your car and a piece of it falls down between the seat and the console? Same deal, with a cookie. But it was half the bloody cookie and it went in that one hole where nothing comes out. You probably know the one - something goes down there and it's in there for good, no matter how you work the vacuum and adjust the seat.
**The product of a slipped stitch plate and a short temper.