Drafting patterns is a strange thing for me. I dread it and dread it for days yet once I sit down to do it, it's really enjoyable. There's a few tricks to be honest and this is what I've learned so far:
1. If you have a pre-existing garment, base your pattern from that. This even includes laying the muslin overtop and tracing it out. Add changes to your tracing as needed.
2. Don't overthink it. Use the muslin mock-up as the clay you can shape into a finished product. Therefore you don't need to think about details at this stage - just focus on getting the shape and fit right.
3. It won't be perfect the first time. If it is, you've done something wonderful to appease the fabric gods so be happy with your success.
4. Keep making mock-ups until you are happy with your pattern. It'll be tough-going at the start but the more you do this, the better you get.
5. Don't forget to add your seam allowance to the pattern before you cut your final fabric out. This is as simple as marking out a 1 cm wide border around the pattern once it's on the final fabric.
I think I might have appeased the gods today for the boot-cover pattern went together with nary a hitch. This was the desired effect:

Thus, starting with a pair of my room-mate's spats (what, we have these things in our house DON'T JUDGE), I grabbed my Blundstone riding boots (which are one of only two things on this costume NOT made by yours truly) and traced their profile on to the muslin. This gave me a basic idea of where the gaiters needed to go. Then, looking at the spats (you're still judging, aren't you), I deduced that three pattern pieces were needed. After measuring the length of my calf from ankle to beyond the knee where the covers stop, I sketched out a rough idea of the pattern shape. There would be pictures but I was working too quickly. But after doing the same for all three pieces, I based them together, put a boot on, and tried it out.
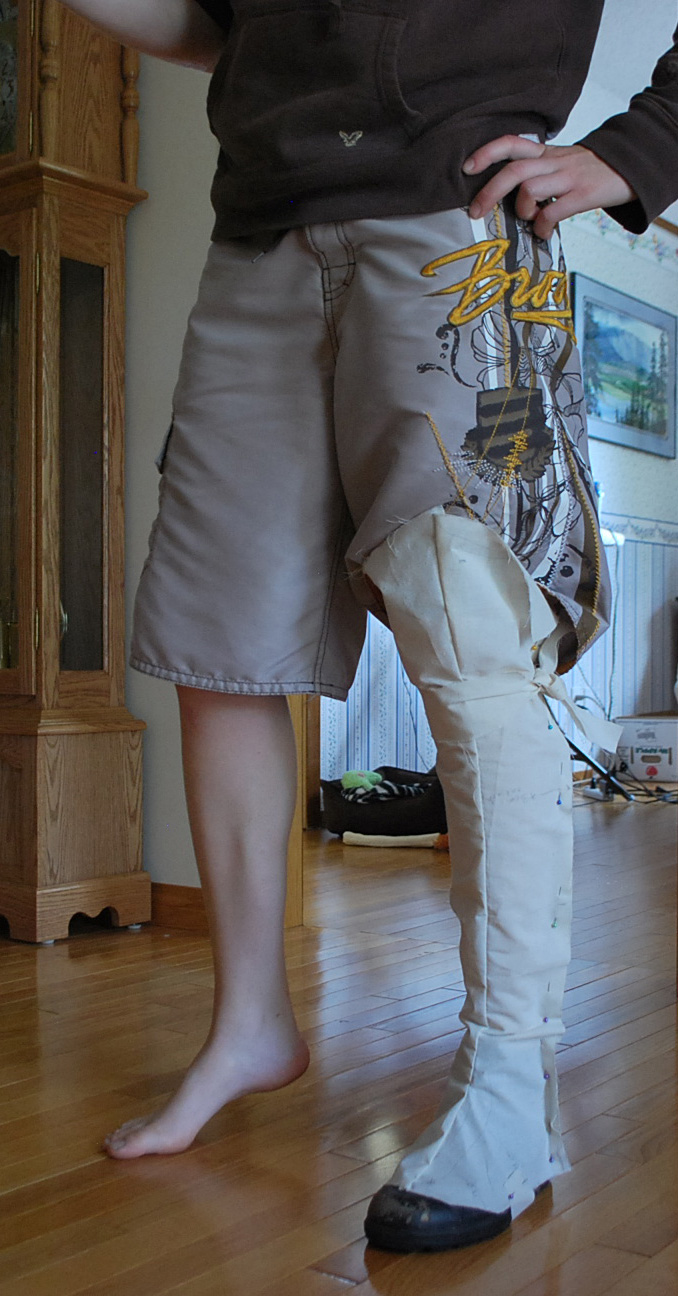

Helllllls yeah! There are a couple things to change:
1. Widen the area around the calf (because I forget to measure this *win*) and the seam allowance isn't big enough.
2. Sort out the tops
But this is close enough to cut out the bases from leather and start sewing this week, which is good because these are going to be Very Time-Consuming. I already have the game-plan in my head there and I'll lay out the details on here as things progress.
Speaking of progression, have a Progress Report!
80% DONE - Sculpt and cast all embellishments
DONE - Sew together and attach the white tails to the doublet
DONE - Make a hood pattern that doesn't totally suck and make the hood
DONE - Finish and weather the doublet
DONE - Make the sword belt
Make the boots
Make the scabbards for the boot-knife, the throwing knives, and the sword-breaker
DONE - Make the under-bracer and the vambrace for the hidden blade
DONE - Finish the details on the shirt
DONE - Make the cloak
Finish the cloak cording
Tidy up shoulder-guards
Attach embellishments
Weather everything
Lastly, the Captain has settled in well-enough to start photobombing.

He's still unsure of a few things but he's making steady progress. I won't move him into the city until the coming week, I think, because I want to spend a full day in the house with him there before I leave him to go to work. At least there are people around at The 'Rents.
I actually enjoyed reading through this posting. Many thanks.
ReplyDeleteBlundstone Footwear